Installing Resmed Oximetry Module Air 10
By Gavin | August 08, 2019
This is a quick post on attaching the oximetry module on the air curve 10. It would also work on the AirSense 10 as well. all by resonance nice thing about this is will record and you can look at the data online, especially if you have the internal modem from my air capabilities for a set up for your unit.

There's a little door on the side of Air 10
It's an error curve 10, and what we're going to do is there's a little door on the side, on the top you have your SD card door, and that's where your SD card stored, but they can get to that off of that as well for your physician.
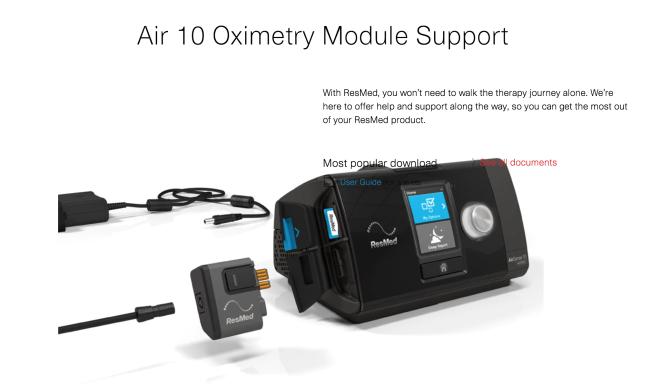
ResMed should be able to see ResMed in the front of the unit, so which way you're putting it in, you open the bottom door and there's a little slot, and all you're going to do is push it into the slot. While pushing in a slot you push on this button at the same time, and you hear that little click, and it clicks on just looks right to the side yet.
Symmetry from the X pod will plugin, right here you have to use the X plug, it plugs in right here as the circular plug more lights over you. The X pod will plugin right there, and then of course yet from the X pod you have your pulse oximeter, and then your probe that will slip on your finger.
Keep the rubber cover on the side closed
Now take this off, all you have to do is push on that same button right there, click it, and it releases. It's just a little release, you can see this thing moving, it's just this little thing here just move, and it releases on a tab.
If you're not using, of course, you can keep the rubber cover on the side closed, but it's the one right underneath VT SD card, you simply slide it in, but make sure when you're sliding in that, you're pushing on this button, at the same time I'll sleep well.
Setup of Air 10
Refer to illustration E or F:
Unplug your device from the power outlet.
Make sure an SD card is inserted into the SD card slot on your device.
Connect the oximeter adapter to your device.
Align the Xpod oximeter connector with the oximeter adapter port and connect them.
Not pictured:
Connect the Xpod oximeter to the finger pulse sensor.
For instructions refer to the User Guide supplied with the finger pulse sensor.
Connect the finger pulse sensor to your finger.
Plug your device back into the power outlet.
The AirSense 10 / AirCurve 10 device will briefly display the oximeter software code, eg, SX123-4567. The S9 device will briefly display Oximeter enabled.
English 3
You are now ready to start therapy. For more information, refer to your device User Guide.
Removing and returning the oximeter adapter and SD card
Remove the sensor from your finger.
Unplug your device from the power outlet.
Press the release button/s on the side of the oximeter adapter and pull gently to remove it from the device.
Pull the Xpod oximeter out of the oximeter port on the oximeter adapter.
Remove the finger sensor cable from the Xpod oximeter.
Open the SD card cover and push in the SD card to release it.
Place the SD card in the protective folder and send it back to your care provider together with the oximeter adapter and this User Guide.
Other web page resource
Air 10 Oximetry Module | ResMed: https://www.resmed.com/us/en/healthcare-professional/support/accessories/air-10-oximetry-module.html